
Table of Contents
Deploying an application with Docker Compose typically requires you to follow these steps: pull the new image, destroy the container and, recreate the container with the new image. The downside, especially if your application takes a few seconds to boot, is that you can have a moment of downtime between destroying the old container and creating the new one.
A zero downtime deployment, commonly referred to as a "blue-green" deployment, involves creating two instances of your application: the old version (blue) and the new version (green). A proxy is used to seamlessly route traffic from the old app to the new app.
About the example
The application used in this example is a simple FastAPI app that performs geolocation on IP addresses — you can view the API docs here. This is a stateless application so, it's easy to Dockerise and demonstrate.
In this example, we'll use Caddy for a reverse proxy server, but you could also use NGINX, Traefik, HAProxy, etc. If you want to take a look at the full source, you can find the example project on GitHub.
Overview
By default, traffic flows to both the Blue instance using Caddy as a reverse-proxy. The green instance is declared in the Docker Compose file but remains inactive.

When deploying, we modify our reverse-proxy configuration to route traffic to only the Green instance. With a graceful shutdown using a SIGTERM signal, we make sure that all requests have been processed and that the Blue instance is idle. Then we can then destroy and recreate the Blue instance with our new image.

When the Blue instance is up-to-date and ready, we can route the traffic to it and remove the Green instance. Once fully deployed, traffic flows normally and the app instance uses the latest image version.
Docker Compose
In our compose.yaml file, we can define both Blue and Green instances of our application. Using YAML anchors, we can avoid repeating the same properties.
There is also a custom Caddy image with our configuration exposed to port 8080. In this example, SSL termination is provided by an NGINX server outside of Docker, but you could use expose Caddy on port 443 and perform SSL termination there instead.
services:
  zerodowndeploy-blue: &app
    container_name: zerodowndeploy-blue
    image: ghcr.io/jamie-mh/zerodowndeploy:latest
    restart: always
    stop_signal: SIGTERM
    stop_grace_period: 30s
    networks:
      - zerodowndeploy

  zerodowndeploy-green:
    <<: *app
    container_name: zerodowndeploy-green
    restart: unless-stopped

  zerodowndeploy-caddy:
    container_name: zerodowndeploy-caddy
    image: ghcr.io/jamie-mh/zerodowndeploy-caddy:latest
    restart: always
    ports:
      - 8080:8080
    networks:
      - zerodowndeploy

networks:
  zerodowndeploy:
    driver: bridge
In our Caddyfile, we can simply expose the server on port 8080 and perform a simple load balance on both instances of the app.
:8080

reverse_proxy {
    to zerodowndeploy-blue:8000
}
To make this self-contained, a custom Caddy image is used. This also includes cURL that we will use to interact with the admin API later.
Make sure to add descriptive labels to the images so that we can remove old versions after a deployment. In this example, lets create a project label.
FROM caddy:2.8-alpine
LABEL project=zerodowndeploy

RUN apk --no-cache add curl

COPY Caddyfile /etc/caddy/Caddyfile
Healthchecks
Optionally, a healthcheck configuration can be added to the app within the Docker Compose file. By pinging the /health endpoint we can check that the application is running and ready to accept requests. If not, due to our restart policy, the container will be restarted if the healthcheck fails.
healthcheck:
  test: [ "CMD", "curl", "-f", "http://localhost:8000/health" ]
  interval: 30s
  timeout: 10s
  retries: 10
  start_interval: 10s
  start_period: 30s
GitHub Actions
To deploy the app, we can use a simple workflow that runs based on a tag. In this case, when a commit is tagged with v[something], the images will be built from that source and the app will be deployed to the remote server.
name: Build and Deploy

on:
  push:
    tags:
      - "v*"

jobs:
  ...
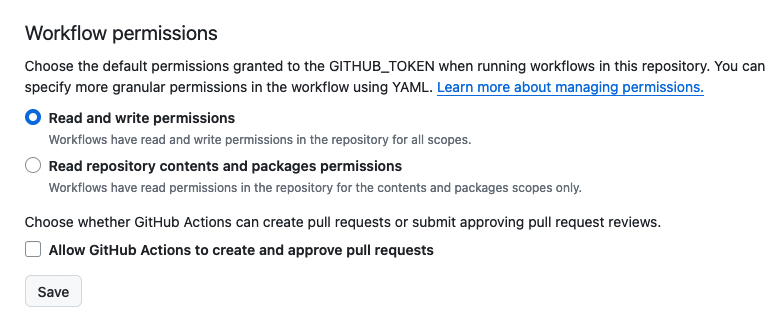
For this workflow to function, you need to grant image registry write permissions to the runner's GITHUB_TOKEN:
We'll use the runner's ephemeral token to log into our Docker registry on the remote host.
Build job
Our first job builds our app and Caddy images, the docker/build-push-action takes care of this in a single step for each.
build:
  runs-on: ubuntu-latest

  steps:
    - name: Checkout
      uses: actions/checkout@v4

    - name: Login to GitHub Container Registry
      uses: docker/login-action@v3
      with:
        registry: ghcr.io
        username: ${{ github.actor }}
        password: ${{ secrets.GITHUB_TOKEN }}

    - name: Set up Docker Buildx
      uses: docker/setup-buildx-action@v3

    - name: Build and push app image
      uses: docker/build-push-action@v5
      with:
        push: true
        context: .
        file: app.Dockerfile
        tags: ghcr.io/jamie-mh/zerodowndeploy:latest,ghcr.io/jamie-mh/zerodowndeploy:${{ github.ref_name }}

    - name: Build and push Caddy image
      uses: docker/build-push-action@v5
      with:
        push: true
        context: .
        file: caddy.Dockerfile
        tags: ghcr.io/jamie-mh/zerodowndeploy-caddy:latest
Deploy job
In order to deploy remotely, we need to set up SSH for our target server. This assumes you have a deploy user on your server that belongs to the docker group (see Managing secrets in Docker Compose and GitHub Actions deployments for more information) and that you've set the DEPLOY_KEY and DEPLOY_HOST secrets.
deploy:
  runs-on: ubuntu-latest
  needs: build

  steps:
    - name: Checkout
      uses: actions/checkout@v4

    - name: Set up SSH
      run: |
        mkdir ~/.ssh
        echo "${{ secrets.DEPLOY_KEY }}" > ~/.ssh/deploy.key
        chmod 700 ~/.ssh
        chmod 600 ~/.ssh/deploy.key

        cat >>~/.ssh/config <<END
        Host remote
            HostName ${{ secrets.DEPLOY_HOST }}
            User deploy
            IdentityFile ~/.ssh/deploy.key
            StrictHostKeyChecking no
            ControlMaster auto
            ControlPath ~/.ssh/control-%C
            ControlPersist yes
        END

    - name: Deploy
      run: |
        ...
In the deploy step, the script will make our blue-green deployment happen. To prepare for the deployment, the following steps will be executed:
- Prepare the Docker command by setting the target to our remote host and logging into the GitHub Container Registry using our ephemeral token
- Adjust the
compose.yamlfile to deploy our created tag instead oflatest. This allows us to rollback easily by retrying the deploy job of a previous workflow. - Pull the images and create the services that don't already exist (for a first deployment for instance)
Once ready, the next step will create our containers accordingly:
- Create the Green instance using the new image and wait for it to become healthy
- Route traffic to the Green instance by patching the Caddy config dynamically
- Recreate the Blue instance with
downandup. Since the images were pulled previously, this will use the new tag. - When Blue is ready to accept requests, route traffic to it and remove Green
- Cleanup old images
route_traffic() {
   echo "Routing traffic to $1"

   case $1 in
      "blue")
          upstreams='[{"dial":"zerodowndeploy-blue:8000"}]'
      ;;
      "green")
          upstreams='[{"dial":"zerodowndeploy-green:8000"}]'
      ;;
   esac

   docker compose exec zerodowndeploy-caddy curl \
      -H "Content-Type: application/json" \
      -d "$upstreams" \
      -X PATCH http://localhost:2019/config/apps/http/servers/srv0/routes/0/handle/0/upstreams
}

up() {
   echo "Starting $1"
   container="zerodowndeploy-$1"
   docker compose up -d "$container"
}

down() {
   echo "Stopping $1"
   container="zerodowndeploy-$1"
   docker compose down "$container"
}

wait_healthy() {
   echo "Waiting for $1 to be healthy"
   container="zerodowndeploy-$1"

   if docker compose exec "$container" \
      curl -I --retry 30 --retry-max-time 0 --retry-all-errors --fail-with-body http://localhost:8000/health
   then
      echo "$1 is healthy"
      return 0
   else
      echo "$1 failed to start!"
      return 1
   fi
}

# Connect to Docker on the remote host and login using the ephemeral token
export DOCKER_HOST=ssh://remote
echo ${{ secrets.GITHUB_TOKEN }} | docker login ghcr.io -u ${{ github.actor }} --password-stdin

# Deploy current tag
sed -i 's/zerodowndeploy:latest/zerodowndeploy:${{ github.ref_name }}/' compose.yaml

# Pull the latest version and create the containers if they don't exist
docker compose pull
docker compose up -d --no-recreate zerodowndeploy-blue zerodowndeploy-caddy

up green

if ! wait_healthy green ; then
   down green
   exit 1
fi

route_traffic green
down blue
up blue
wait_healthy blue
route_traffic blue

down green

# Clean old images with the 'project=zerodowndeploy' label
docker image prune -af --filter="label=project=zerodowndeploy"
Notice that in the deploy script, that if our new instance (Green) fails to start, it will be destroyed and the deployment will halt. This protects us from potential misconfigurations and prevents downtime in the case of a deployment failure.
Clean job
After a while, it makes no sense to keep old images. The following job will clean up old images but keep at least 3 versions in order to rollback if necessary.
clean:
  runs-on: ubuntu-latest
  needs: deploy

  steps:
    - name: Delete old images
      uses: snok/container-retention-policy@v3.0.0
      with:
        account: user
        token: ${{ secrets.PAT }}
        image-names: "zerodowndeploy*"
        image-tags: "!latest v*"
        cut-off: 2d
        keep-n-most-recent: 3
A personal access token stored in a secret called PAT must be defined with registry read/write/delete permissions to work. The ephemeral GITHUB_TOKEN cannot be used since it doesn't have permission to list packages, see the snok/container-retention-policy README for more information.
Testing
Using K6 to perform a load test during a deployment with a few hundred requests per second yields the following results:
        /\      |‾‾| /‾‾/   /‾‾/
   /\  /  \     |  |/  /   /  /
  /  \/    \    |     (   /   ‾‾\
 /          \   |  |\  \ |  (‾)  |
/ __________ \  |__| \__\ \_____/ .io

   execution: local
      script: k6.js
      output: -

   scenarios: (100.00%) 1 scenario, 200 max VUs, 1m30s max duration (incl. graceful stop):
            * default: 200 looping VUs for 1m0s (gracefulStop: 30s)


   data_received..................: 5.9 MB 97 kB/s
   data_sent......................: 545 kB 8.9 kB/s
   http_req_blocked...............: avg=5.27ms   min=0s      med=0s      max=525.06ms p(90)=1µs     p(95)=1µs
   http_req_connecting............: avg=601.74µs min=0s      med=0s      max=50.76ms  p(90)=0s      p(95)=0s
   http_req_duration..............: avg=53.13ms  min=35.55ms med=48.82ms max=180.61ms p(90)=71.31ms p(95)=80.24ms
     { expected_response:true }...: avg=53.13ms  min=35.55ms med=48.82ms max=180.61ms p(90)=71.31ms p(95)=80.24ms
   http_req_failed................: 0.00%  ✓ 0          ✗ 11417
   http_req_receiving.............: avg=132.29µs min=6µs     med=57µs    max=16.13ms  p(90)=269µs   p(95)=371.19µs
   http_req_sending...............: avg=186.48µs min=11µs    med=103µs   max=21.89ms  p(90)=352.4µs p(95)=526.19µs
   http_req_tls_handshaking.......: avg=4.64ms   min=0s      med=0s      max=473.65ms p(90)=0s      p(95)=0s
   http_req_waiting...............: avg=52.81ms  min=25.93ms med=48.5ms  max=180.49ms p(90)=70.95ms p(95)=79.88ms
   http_reqs......................: 11417  187.095807/s
   iteration_duration.............: avg=1.05s    min=1.03s   med=1.04s   max=1.56s    p(90)=1.07s   p(95)=1.08s
   iterations.....................: 11417  187.095807/s
   vus............................: 5      min=5        max=200
   vus_max........................: 200    min=200      max=200
With 187 requests per second on average, the median response time is 48.82ms and none of the requests failed to complete. The deployment works as expected with no downtime.
Conclusion
For many applications, Docker Compose alone is sufficient for deploying and running. This article demonstrates that with a little scripting, it's easy to deploy a containerised application to a server with no downtime. If your needs are more complex however, you might need to consider a container orchestration tool such as Kubernetes, Nomad or Docker Swarm.